Tensorflow, pytorch, caffe 모델 서빙
급하게 10일 안에 3가지 다른 프레임웍으로 짜여진 딥러닝 네트워크를 웹으로 데모 서비스를 해야 하는 상황이 생겼다.
이참에 좋은 기회로 삼고 docker와 서빙 서버를 구현해보고자 했다.
Tensorflow model로 변환해서 tensorflow serving api를 이용하려 하였지만 모델변환이 쉽지 않다.
이 와중에 pytorch tutorial에서 좋은 정보를 찾았다.
더 좋고 안정적이며 효율적인 방법들이 많겠지만 간단히 데모를 보여주면 되었기에 위의 튜토리얼을 참고.
웹 어플리케이션 서버를 세팅하는것도 생각보다 까다로웠다(docker 를 급하게 공부하고 처리하다 보니..).
연구실에서 사용하는 딥러닝 서버는 고정 아이피를 이용하고 실수하면 큰일이 나기 때문에 집에 설치해둔 우분투 서버를 디버깅 용으로 이용하였다.(포트포워딩을 이용.)
총 3대의 서버중 성능이 가장 안좋은 NVIDIA Titan xp@12Gb x4로 운영하기로 하였다.
(3대 모두 몇개월전 세팅하였는데 이번 기회에 Docker 환경으로 다 변경해야 겠다.)
웹, 앱 서버에 대한 이해가 부족해서 자료 검색 부터 진행하였는데 다음에 좋은 글이 작성되어 있었다.
일단 급하니 어느정도 이해시키고 구현하면서 체득하는걸로.
모델별로 다른 환경을 필요로 하기 때문에 docker로 관리하기로 가닥을 잡고 아래와 같은 구조로 설계를 해보았다.
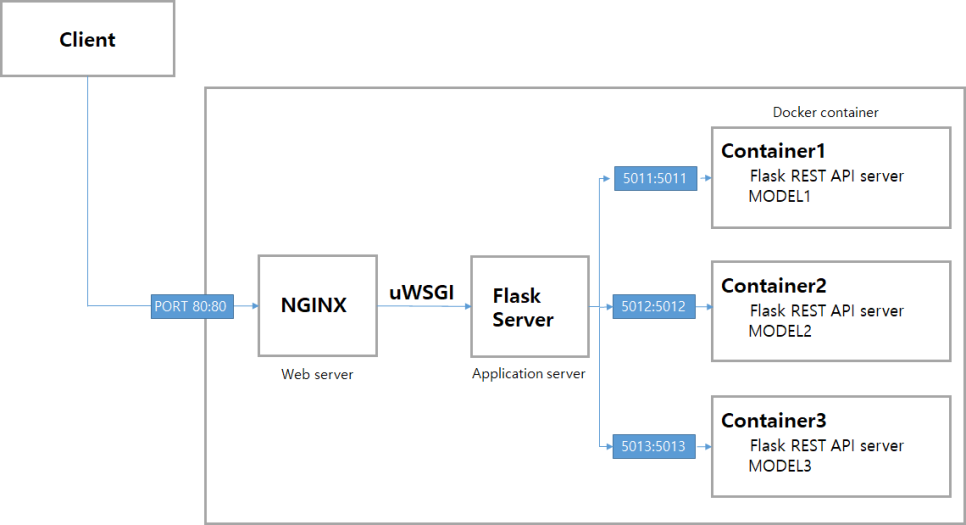
처음에 구상한 구조는 위와 같은데 각 model을 docker container로 REST API 서버 처럼 이용하고 매인 Flask server에서 합산 처리를 해줄 예정이였다. (잘 작성한건지 확신이 안선다..)
알고보니 간단한 NGINX 없이 FLASK만으로 어플리케이션 서버를 구성할 수 있다고 해서 아래처럼 구성하여 테스트를 진행하였다.

1
2
Container1: -p 5011:5011
Container1: -p 5012:5012
Docker 안의 flask에 우분투(Host) 에서 docker 의 flask 로 접속하기 위해서는 flask 에서 아래와 같이 해주어야했다.
또한 여러 container 에 접속하기 위해 각각 아래처럼 할당 하였다.
1
2
3
4
5
6
7
8
# script1
app.run(host='0.0.0.0', port =  5011)

# script2
app.run(host='0.0.0.0', port =  5012)

# script3
app.run(host='0.0.0.0', port =  5013)
우분투(ssh 세션) host 에서 접속확인.
1
2
3
$ curl -k http://localhost:5011/

Hi, connected
외부에서도 접속 가능한지 확인하기 위해서 외부 PC 에서 접속을 해보았다.
접속은 네이버 whale 을 이용하였다
1
2
3
http://<해당 PC IP>:5011

Hi, connected
이로써 Docker 환경에서 실행된 Flask 서버에 외부 PC 에서 접속할 수 있었다.
이제 해당 서버를 REST API 서버 처럼 구성해야 했다.
데모 버전을 제작하는것이여서 웹페이지에서 업로드 된 파일을 ndarray 로 변환하여 Json 파일에 str 형식으로 넣어서 전송하기로 하였다.
서빙하고자 하는 모델들이 모두 bounding box를 예측하는 object detection 모델이여서 이미지를 넣으면 이미지 위에 박스를 표시한 결과물을 출력해서 보여주면 된다.
따라서 우선 모델을 단순화 하여 ndarray를 넣으면 box가 그려진 ndarray를 return 하는 class를 구성하였다.
1
2
3
4
5
6
7
8
9
10
11
12
13
14
15
16
17
18
import your_pack

class SurvedModel:

    def __init__(self):
        '''
        Model should be loaded on memory here.
        '''
        # self.your_model = ~~

    def predict (self, img):
        '''
        Preprocessing & inference & postprocessing part.
        # img;attribute = {shape:[H, W, 3],  type : ndarray}
        # return;attribute = {shape : [H, W, 3], type : ndarray}

        # return your_postprocessing(self.your_model(your_preprocessing(img)))
        # Draw box on the imag
이와 같이 기 작성된 모델을 class 처럼 작성하고 predict 함수를 이용하여 inference를 간단히 할 수 있도록 구성하였다.
모델은 공개가 불가능하여 대략 적인 구조만 남겨두었다.
그다음으로 해당 모델을 flask를 이용하여 서빙 하였다.
1
2
3
4
5
6
7
8
9
10
11
12
13
14
15
16
17
18
19
20
21
22
23
24
25
26
27
28
29
30
31
32
33
34
35
36
37
38
39
40
41
42
43
44
45
46
47
48
49
50
51
52
53
54
55
56
57
58
59
60
61
62
from flask import Flask, Response, request
import SurvedModel
import time
import json
import tensorflow as tf
import numpy as np
import base64

app = Flask(__name__)
model = SurvedModel()


@app.route('/get_result', methods=['POST'])
def predict():
    ############################################### Test code #################################################
    # prev = time.time()
    #
    # # Load Image
    # img = cv2.imread('/opt/project/paprika_model/test.jpg')
    # output = model.predict(img)
    #
    # return f'Connected : {output.shape}, Time : {time.time() - prev}s , GPU : {tf.test.is_gpu_available()}'
    ###########################################################################################################

    # For check inference time.
    time_start = time.time()

    # Get json from client. request of client should be mimetype="application/json"
    upload_json = request.json
    '''
    upload_json = {input_img : <DAT>}
    '''
    print(upload_json['input_img'])

    r = base64.decodebytes(upload_json['input_img'].encode())
    input_img = np.fromstring(r, dtype=np.uint8)

    input_img = input_img.reshape((upload_json['info']['height'], upload_json['info']['width'], upload_json['info']['channel']))
    print('CHANGE +++++++++++++++++++++++++++++\n', input_img.shape)

    # predict.
    output = model.predict(input_img)
    print('CHANGE +++++++++++++++++++++++++++++\n', output.shape)
    print(output)

    returns_dat = base64.b64encode(np.array(output))

    # map as json.
    output_json = json.dumps({'data': returns_dat.decode(),
                              'info': {'height': output.shape[0], 'width': output.shape[1], 'channel': output.shape[2]},
                              'time': f'{(str(time.time() - time_start))[:5]}s',
                              'is_gpu': tf.test.is_gpu_available()})

    # dat = base64.b64decode(returns_dat.decode().encode())
    # dat = np.fromstring(dat, dtype=np.float)
    # print(dat.shape)

    # response.
    return Response(response=output_json, status=200, mimetype="application/json")

if __name__ == '__main__':
    app.run(debug=True, host='0.0.0.0', port=5011)
코드 자체는 어렵지 않고 짧아서 따로 주석은 작성하지 않았다. (나중에 시간날때 보면서 다시 공부할겸.)
데이터 자체를 넘겨줄 방법을 여러가지로 생각해 보았는데 인코딩 문제랑 데이터 저장 문제를 빠르게 해결하려고 프론트에서 받은 이미지를 numpy array 형태로 변환하고, base64 encoding하여 보냈다, 리턴할때도 같은 방식으로.
받을때는 문제가 조금 있었는데 데이터를 받고서 decoding후 numpy array로 변환하니 배열의 크기가 달라지는 현상이 있었다.
알고보니 네트워크 출력값이 float인데 int형으로 복원하려니 생기던것.
float 으로 변환하여 해결하였다.
프론트에서 요청은 아래와 같이 작성하였다.
1
2
3
4
5
6
7
8
9
10
11
12
13
14
15
16
17
18
19
20
21
22
23
24
25
26
27
28
29
30
31
32
33
34
35
36
37
38
39
40
41
42
43
44
45
46
47
# Set content_type to header.
content_type = 'application/json'
headers = {'content-type': content_type}

# upload image string array data.
img_file = request.files['file'].stream.read()

img = cv2.imdecode(np.fromstring(img_file, np.uint8), cv2.IMREAD_COLOR)
print(img)

# map to json.
send = base64.b64encode(np.array(img))

request_json = json.dumps({'input_img': send.decode(),
                            'info': {
                                'height': img.shape[0],
                                'width': img.shape[1],
                                'channel': img.shape[2]
                            }
                            })

print('request_json\n', request_json)

# http request.
response = requests.post('<address>', data=request_json, headers=headers)
# print(response)

# ['data', 'time', 'is_gpu']
response_json = response.json()

# change to numpy array.
r = base64.decodebytes(response_json['data'].encode())
response_dat = np.fromstring(r, dtype=np.float)
print(response_dat)

response_dat = response_dat.reshape((response_json['info']['height'],
                                        response_json['info']['width'],
                                        response_json['info']['channel']))

# decodeed numpy image.
print(response_dat)
plt.figure(figsize=(7, 7))
plt.imshow(response_dat)
timenow = str(time.time())
fname = os.path.join('<path>', timenow + '.png')
plt.axis('off')
plt.savefig(fname)
대략 이미지 받아오면 numpy array로 변환 후 딥러닝 서버에 요청.
문제는 출력시에 저장해서만 보여주고 있는데 inference 가 여러번 실행될 경우 데이터가 쌓이게 된다.
발표가 급하다 보니 이부분은 추후에 해결 하는걸로.
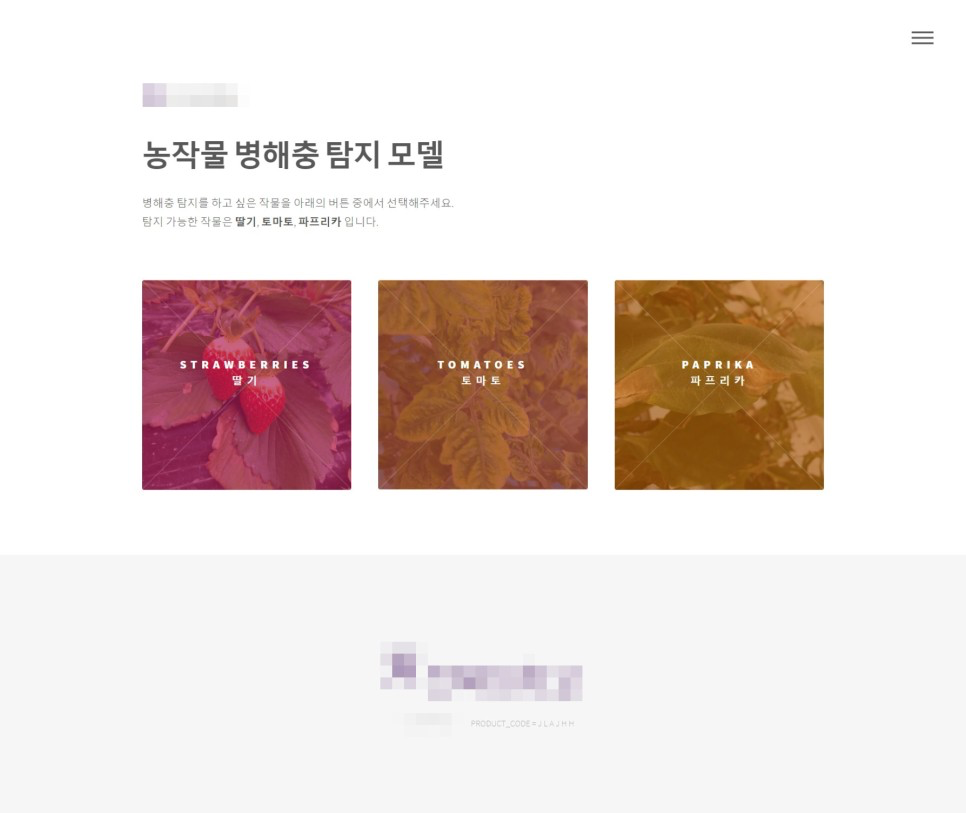
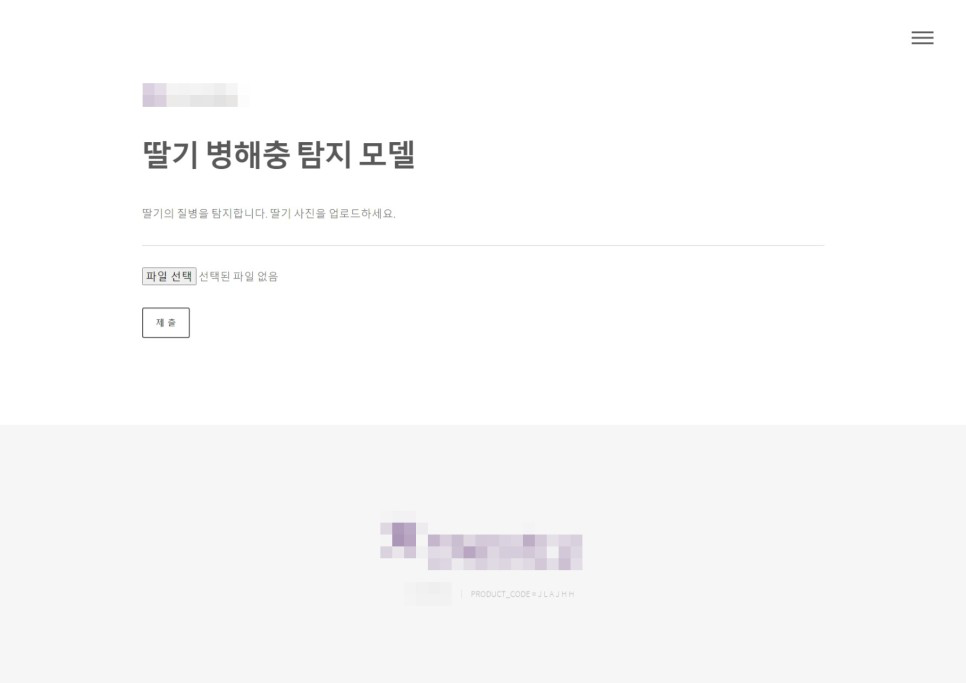
아래는 구현된 페이지와 출력 결과 페이지 이다.

p.s 웹 프론트 작업은 이 리포에 위치한다.