MediaPipe 파헤치기 (3)
해당 글은 본인이 공부하면서 파악하기 위해서 작성한 글입니다. 잘못된 정보나 추가적인 정보가 들어가야 한다면 댓글로 알려주시면 감사하겠습니다!
이번 포스팅에서는 실제 graph파일인 mediapipe/graphs/hand_tracking/hand_tracking_desktop_live.pbtxt와, 저번 포스팅에서 마무리 못했던 //mediapipe/graphs/hand_tracking:desktop_tflite_calculators에 대해서 알아보겠습니다.
우선 저번 포스팅에서 사용했던 mediapipe/graphs/hand_tracking/hand_tracking_desktop_live.pbtxt에 대해서 살펴 보겠습니다.
MediaPipe 사이트에서는 자체적으로 pbtxt로 작성된 그래프의 구조를 볼 수 있도록 Visualizer를 제공하고 있습니다.
해당 사이트에 가면 좌측은 그래프의 이미지, 우측은 해당 pbtxt 정보가 출력됩니다. 이제 테스트 하려고 했던 hand_tracking_desktop_live.pbtxt의 데이터를 복사해서 우측에 넣어보겠습니다.
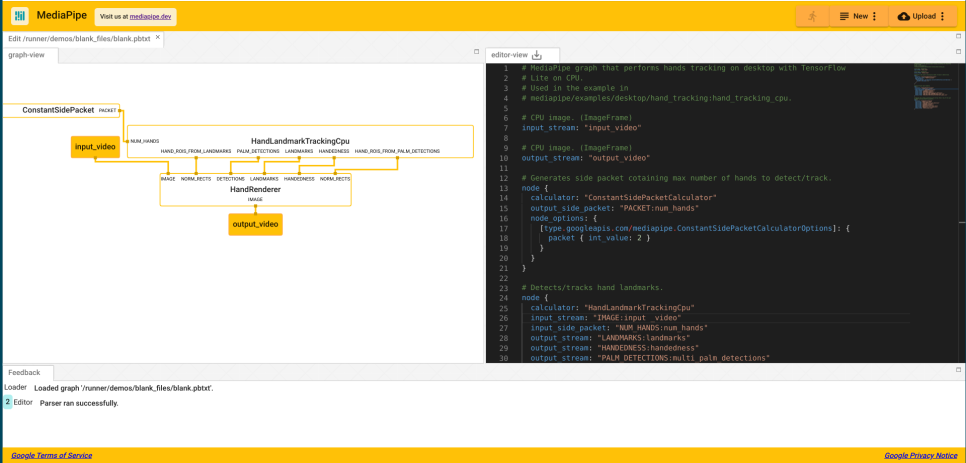
보이는 것 처럼 좌측에 깔끔한 구조를 볼 수 있습니다. 이제 pbtxt를 하나씩 보겠습니다.
1
2
3
4
5
6
7
8
9
10
# MediaPipe graph that performs hands tracking on desktop with TensorFlow
# Lite on CPU.
# Used in the example in
# mediapipe/examples/desktop/hand_tracking:hand_tracking_cpu.

# CPU image. (ImageFrame)
input_stream: "input_video"

# CPU image. (ImageFrame)
output_stream: "output_video"
input_stream:은 input_video
output_stream:은 output_video로 지정 되어있습니다.
1
2
3
4
5
6
7
8
9
10
11
12
13
14
15
16
17
18
19
20
21
22
23
24
25
26
27
28
29
30
31
32
33
34
35
36

# Generates side packet cotaining max number of hands to detect/track.
node {
  calculator: "ConstantSidePacketCalculator"
  output_side_packet: "PACKET:num_hands"
  node_options: {
    [type.googleapis.com/mediapipe.ConstantSidePacketCalculatorOptions]: {
      packet { int_value: 2 }
    }
  }
}

# Detects/tracks hand landmarks.
node {
  calculator: "HandLandmarkTrackingCpu"
  input_stream: "IMAGE:input _video"
  input_side_packet: "NUM_HANDS:num_hands"
  output_stream: "LANDMARKS:landmarks"
  output_stream: "HANDEDNESS:handedness"
  output_stream: "PALM_DETECTIONS:multi_palm_detections"
  output_stream: "HAND_ROIS_FROM_LANDMARKS:multi_hand_rects"
  output_stream: "HAND_ROIS_FROM_PALM_DETECTIONS:multi_palm_rects"
}

# Subgraph that renders annotations and overlays them on top of the input
# images (see hand_renderer_cpu.pbtxt).
node {
  calculator: "HandRendererSubgraph"
  input_stream: "IMAGE:input_video"
  input_stream: "DETECTIONS:multi_palm_detections"
  input_stream: "LANDMARKS:landmarks"
  input_stream: "HANDEDNESS:handedness"
  input_stream: "NORM_RECTS:0:multi_palm_rects"
  input_stream: "NORM_RECTS:1:multi_hand_rects"
  output_stream: "IMAGE:output_video"
}
이제 구조를 보면 node에는 calculator, input_stream, output_stream들이 정의가 되어있고 side_packet 이라는 용어도 보입니다. 자세한 node의 정보는 간단한 예제와 함께 여기서 확인 가능합니다.
일단 가장 먼저 보이는 calculator부터 확인해 봅시다.
1
2
3
// Nodes produce and/or consume packets, and they are where the bulk of the graph’s work takes place.
// They are also known as “calculators”, for historical reasons. Each node’s interface defines a
// number of input and output ports, identified by a tag and/or an index. See Calculators for details.
결국 Node는 calculator 그 자체이고 여러 입력 포트와 아웃풋 포트를 가지고 있는군요. 이제 Stream과 side packet에 대해서 봅니다.
1
2
// A stream is a connection between two nodes that carries a sequence of packets, whose timestamps
// must be monotonically increasing.
Stream은 말그대로 타임스탬프가 단조롭게 증가하는 시퀀스 형태의 데이터 였습니다. 여기서는 비디오가 되겠습니다.
1
2
3
// A side packet connection between nodes carries a single packet (with unspecified timestamp).
// It can be used to provide some data that will remain constant, whereas a stream represents a flow
// of data that changes over time.
Side packet은 타임스탬프가 지정되지 않은 single packet이라고 하는군요. 시간에 따라 변화하는 상수 데이터가 될 수도 있다고 하는군요.
흐음 이제 대략적으로 구조 파악이 되었습니다. 이제 그래프의 구조를 보면서 따라가 봅니다.
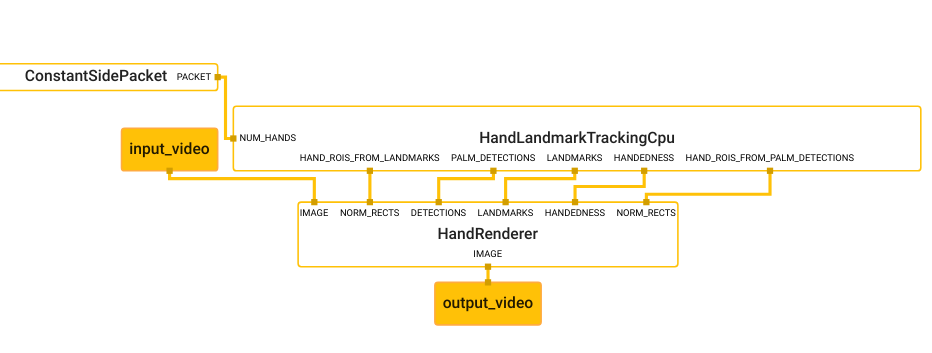
처음 input_video가 들어오는 HandLandmarkTrackingCpu을 살펴보겠습니다.
calculator의 이름은 HandLandmarkTrackingCpu이고 입력과 출력은 다음과 같습니다.
| 입력 | 출력 | ||
|---|---|---|---|
| input_stream | IMAGE:input _video | output_stream: | LANDMARKS:landmarks |
| input_side_packet | NUM_HANDS:num_hands" | output_stream: | HANDEDNESS:handedness |
| output_stream: | PALM_DETECTIONS:multi_palm_detections | ||
| output_stream: | HAND_ROIS_FROM_LANDMARKS:multi_hand_rects | ||
| output_stream: | HAND_ROIS_FROM_PALM_DETECTIONS:multi_palm_rects |
입력 으로 비디오와 손의 개수를 받고, 출력으로 여러 정보들을 출력하고 있습니다.
그런데 정작 내부 구조는 알 수 없습니다.
이제 HandLandmarkTrackingCpu가 어디 있는지 찾아 보도록 하겠습니다.
저번 포스팅에서 아직 보지 못했던 deps HandLandmarkTrackingCpu가 있습니다.
해당 위치로 가서 BUILD파일을 보면 desktop_tflite_calculators를 찾아볼 수 있습니다.
1
2
3
4
5
6
7
8
9
10
cc_library(
    name = "desktop_tflite_calculators",
    deps = [
        ":desktop_offline_calculators",
        "//mediapipe/calculators/core:constant_side_packet_calculator",
        "//mediapipe/calculators/core:merge_calculator",
        "//mediapipe/graphs/hand_tracking/subgraphs:hand_renderer_cpu",
        "//mediapipe/modules/hand_landmark:hand_landmark_tracking_cpu",
    ],
)
헛… 다시 deps 파일만 잔뜩 있군요. 보니 동작에 필요한 core 파일들도 보이는것 같습니다.
바로 위쪽에 desktop_offline_calculators가 위치하고 있으니 살펴 봅니다.
1
2
3
4
5
6
7
8
9
10
11
12
	cc_library(
    name = "desktop_offline_calculators",
    deps = [
        "//mediapipe/calculators/core:flow_limiter_calculator",
        "//mediapipe/calculators/core:gate_calculator",
        "//mediapipe/calculators/core:immediate_mux_calculator",
        "//mediapipe/calculators/core:packet_inner_join_calculator",
        "//mediapipe/calculators/core:previous_loopback_calculator",
        "//mediapipe/calculators/video:opencv_video_decoder_calculator",
        "//mediapipe/calculators/video:opencv_video_encoder_calculator",
    ],
)
core 파일에 대한것과 비디오에 대한 엔코더, 디코더 calculator가 있습니다.
이부분은 나중에 활용할 수 있겠습니다.
이제 남은것은 아래의 2가지 입니다.
//mediapipe/graphs/hand_tracking/subgraphs:hand_renderer_cpu//mediapipe/modules/hand_landmark:hand_landmark_tracking_cpu
bazel target 명을 보니 어디서 많이 본것 같습니다!

위에서 보았던 claculator들의 이름과 같습니다! 이제 저기에 해당 calculator들의 실마리가 있을것으로 예상하고 하나씩 살펴봅니다.
우선 //mediapipe/graphs/hand_tracking/subgraphs:hand_renderer_cpu부터 살펴 보기로 합니다. 가서 빌드파일의 타겟명을 살펴봅니다.
1
2
3
4
5
6
7
8
9
10
11
12
13
14
15
16
17
mediapipe_simple_subgraph(
    name = "hand_renderer_cpu",
    graph = "hand_renderer_cpu.pbtxt",
    register_as = "HandRendererSubgraph",
    deps = [
        "//mediapipe/calculators/core:begin_loop_calculator",
        "//mediapipe/calculators/core:end_loop_calculator",
        "//mediapipe/calculators/core:gate_calculator",
        "//mediapipe/calculators/core:split_vector_calculator",
        "//mediapipe/calculators/util:annotation_overlay_calculator",
        "//mediapipe/calculators/util:collection_has_min_size_calculator",
        "//mediapipe/calculators/util:detections_to_render_data_calculator",
        "//mediapipe/calculators/util:labels_to_render_data_calculator",
        "//mediapipe/calculators/util:landmarks_to_render_data_calculator",
        "//mediapipe/calculators/util:rect_to_render_data_calculator",
    ],
)
여러 core 와 util, 그리고 여기에는 직접적인 graph를 지정해둔것을 볼 수 있습니다!
이제 저 그래프를 열어서 살펴 봅니다. 너무 길어서 링크로 남깁니다. 저는 그래프 이미지를 볼거에요.
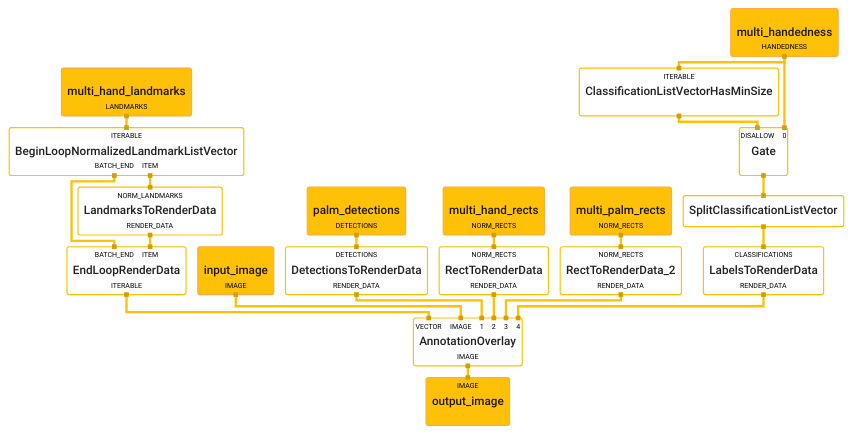
허걱.. 엄청 복잡하네요…
여기서는 전부 살펴보지 않고 실제 수정을 하기 위해서 어느 수준까지 들어가야 하나 체크 하도록 하겠습니다.
가장 처음에 나오는 node인 DetectionsToRenderDataCalculator에 대해 살펴보겠습니다.
1
2
3
4
5
6
7
8
9
10
11
12
# Converts detections to drawing primitives for annotation overlay.
node {
  calculator: "DetectionsToRenderDataCalculator"
  input_stream: "DETECTIONS:palm_detections"
  output_stream: "RENDER_DATA:detection_render_data"
  node_options: {
    [type.googleapis.com/mediapipe.DetectionsToRenderDataCalculatorOptions] {
      thickness: 4.0
      color { r: 0 g: 255 b: 0 }
    }
  }
}
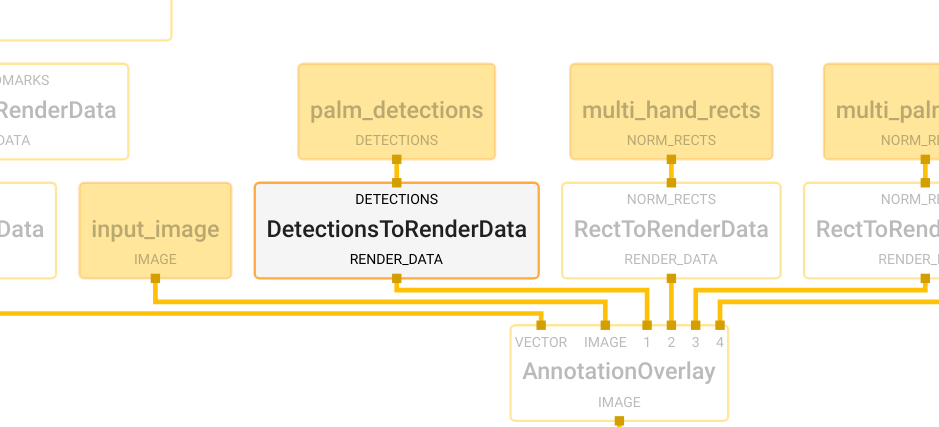
이게 어디에 있을까 하면 target 인 hand_randerer_cpu를 보면 util로 들어가 있는것을 볼 수 있습니다.
//mediapipe/calculators/util:detections_to_render_data_calculator
다시한번더 target을 찾았습니다.
해당 위치로 가면 detections_to_render_data_calculator.cc 파일을 찾을 수 있습니다.
결국 저 calulator들이 노드이며 이 노드들은 하위 calculator들의 집합이 모듈처럼 사용될 수 있습니다.
이제 한번 calculator의 구조를 살펴 볼까요?
1
2
3
// A calculator is created by defining a new sub-class of the CalculatorBase class, implementing a
// number of methods, and registering the new sub-class with Mediapipe. At a minimum, a new
// calculator must implement the below four methods.
이제 여기서 말하는 4개의 메서드를 살펴봅니다.
GetContract()
여기에는 input이나 output의 예상 타입을 미리 지정해둘 수 있습니다. 이 메서드는 static 메서드로 graph가 initialize 될때 mediapipe 프레임워크는 여기에 작성한 입력, 출력의 타입을 실제 graph에 연결된 packet의 타입과 맞는지 확인하게 됩니다.Open()
그래프가 시작한 후에 Mediapipe 프레임워크는 Open 함수를 호출 합니다. 입력 side packet은 이 시점에서 사용이 가능합니다. pbtxt파일에서 노드 설정들을 해석하고 calculator를 준비합니다.Process()
입력 packet을 받는 시점이고 입력 packet이 끊기지 않고 graph로 들어오는 동안 계속 해서 반복되는 부분입니다.Close()
입력 packet이 더이상 들어오지 않을때 호출 됩니다.
여기서는 간단히 설명 했지만 MediaPipe 페이지에는 자세히 설명 되어있으니 참고 하세요!
이제 Calculator들의 동작이 어디서 이루어지는지와 그 구조에 대해서 알 수 있었습니다.
들어가고 들어가서 이제 힌트를 찾았습니다.
다음 포스팅에서는 다시 앞으로 돌아가서 모델의 입력과 출력을 수행했던 calculator에 대해서 먼저 살펴 보겠습니다.